Google Tag Manager’s auto-event listeners are a huge USP for the product, but what you gain in flexibility you may be losing in account control and data integrity. This post highlights a few considerations alongside some examples of when auto-event listeners may let you down and break your tracking without your knowledge – not ideal!
For some background, Google Tag Manager has the capability, following a website interaction, to automatically trigger tags. This is achieved through it’s native event listeners that can listen to the following interactions and trigger events:
- Link Clicks
- All Clicks
- YouTube Video Interactions
- Element Visibility
- Page scroll depth
- Form Submissions
These events can be listened to automatically and do not require any website development to begin working with, which makes them incredibly useful and flexible but equally, an extensive use of these triggers could be a sure sign of trouble ahead for your tracking.
Why, you ask? Let’s jump into a simple example:
Take this very basic HTML within a page of an ecommerce website:
<div class="checkoutButton">Checkout</div>It would be nice and easy to create a Click listener that checks that the click is on an element with a class that equals checkoutButton, something like this:
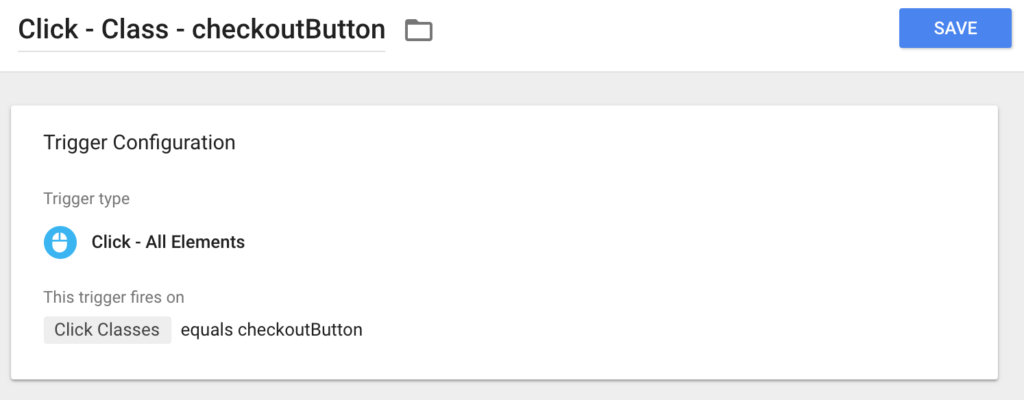
However, let’s fast forward 3-months and your developers have made some tweaks to the website CSS/HTML and this button now has the following code:
<div class="ctaButton">Checkout</div>Your trigger is now broken, and while, in theory, you should have been made aware of that button change, spotted the code change and subsequently updated your trigger… in reality that’s a lot of IF’s and more often than not this goes unnoticed for a couple of days (best case!), you’ve lost some data and your stakeholders are beginning to question its future accuracy…
At this point, you’ll probably be looking for an alternative solution – how can you stop this from happening again in the future? We’ve got some tips below that can help with just that.
Before we continue, I should caveat – no single solution is bullet-proof and they will all rely on your developers working with you and maintaining the implementation during any website/page changes. The most important thing is that the implementation you choose is documented and in your developer control (or they, at the very least, know about it!). A strong relationship with your developers is critical in providing long-lasting and credible data.
Things can, and will likely still break, but this should put the responsibility for the maintenance of the implementation with your developers – not entirely on your shoulders. We recommend implementing some Automated Functional Testing to automatically test and QA your implementation where possible, to save you manually checking periodically (something for a separate post).
We recommend the following approaches to deploying tags (in order of preference):
- Adding data-* attributes to clicks
- Using GTM’s Data Layer
- Using documented and consistent website ID’s/Class names
1. The Data Layer Approach
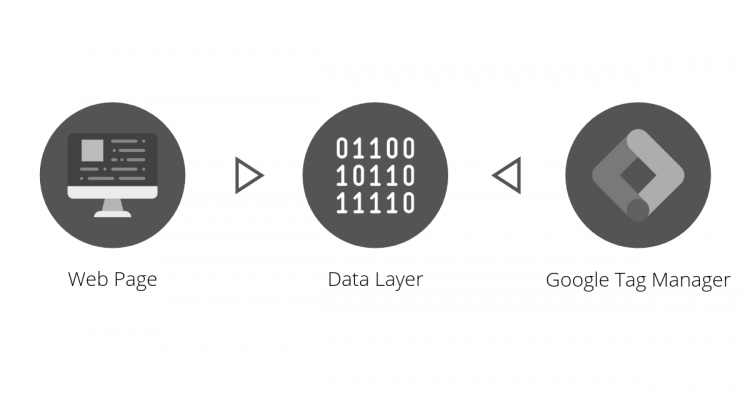
This is the best practice approach to sending data to Google Tag Manager and our recommended solution. With this approach, the website sends structured events to Google Tag Manager which can be interpreted in a consistent way. For example, rather than GTM listening for “A click on a button with the class of X” instead the website tells GTM “This specific event has occurred” and you take an action accordingly.
The Data Layer acts as a middle-man between your website and Google Tag manager and any data you pass to the Data Layer will become available for use in GTM.

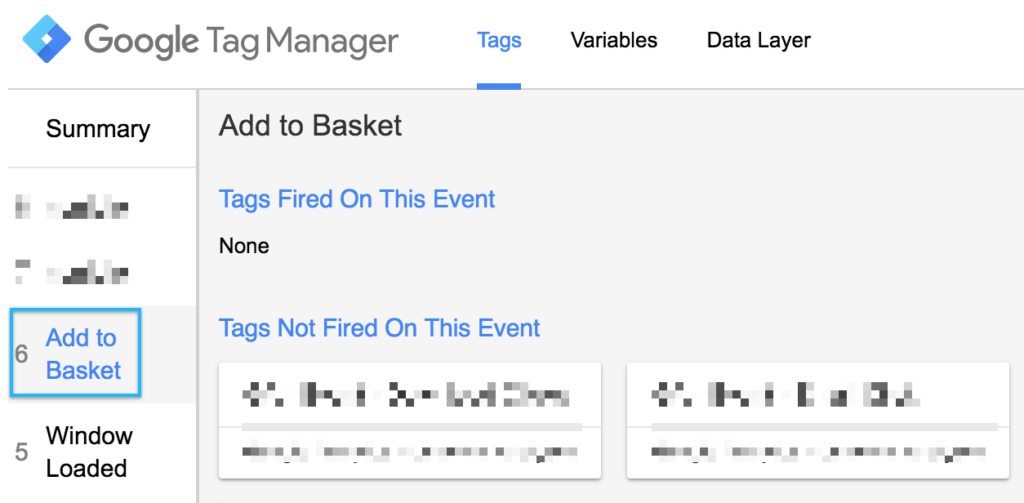
We’ll use the website action “Add to Basket” in the below example.
1. First of all, add your data into the Data Layer.
On your website, you use code similar to the following after a user interaction occurs that you would like to track. We’ll use “Add to Basket” for our example:
window.dataLayer = window.dataLayer || [];
window.dataLayer.push({
   'event': 'Add to Basket'
});
Note: Additional information can be passed to the Data Layer (you can pass any plain object, including nested data) but the ‘event’ property is important, this is what causes Google Tag Manager to evaluate it’s rules and we recommend it’s always passed in.
2. Check your Data Layer code is working
Use the Preview Window to test if your interaction is working. If it’s working correctly you should see the event showing on your page:
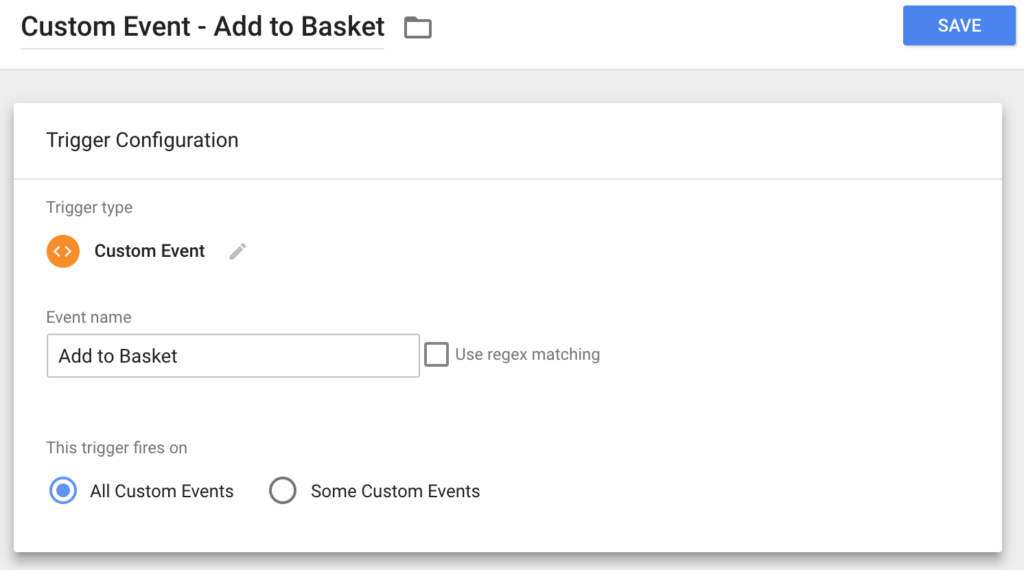
3. Create a trigger in Google Tag Manager for your new website event
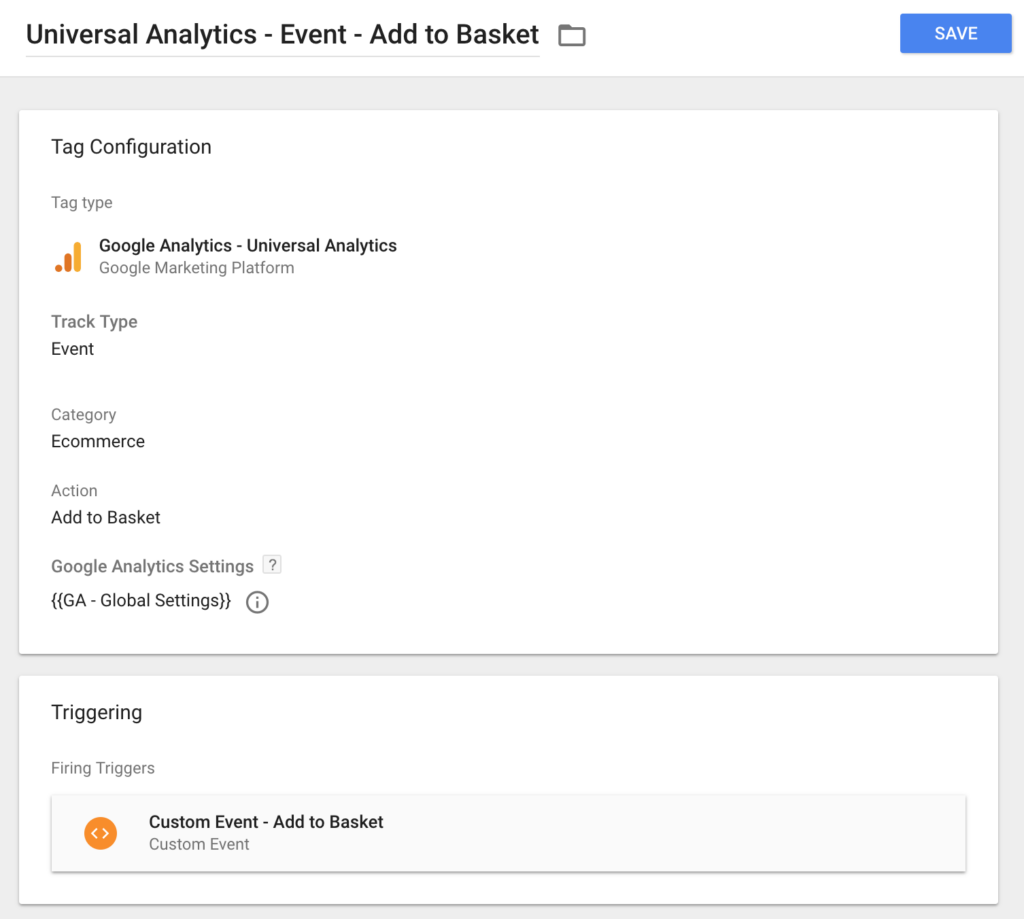
4. Create a corresponding tag and add your new trigger
We’re creating a Google Analytics event in our example but you could use any marketing tag of your choice.
5. You’re done!
You now have a very specific piece of code that is maintainable and directly related to Google Tag Manager. The code is structured and clear and there should be no ambiguity between what is required and what is not between you and your development team.
2. The data-* attribute(s) approach
Sometimes you won’t be able to deploy the above approach (or you want to use automated click/linkClick events rather than the Data Layer) in that case our next favoured approach is to use data attributes to identify user interactions within the website.
If we take our first example again, and apply a data attribute, you can immediately see how the element gains some clarity.
<div data-gtm-event="checkout-click" class="blue ctaButton">Checkout</div>We now have an attribute data-gtm-event (we like to namespace our attributes as to not conflict and to make it clear that they’re for GTM, but you can name them as you wish!) and it contains our event “checkout-click”.
An interaction with an element with this attribute added won’t automatically create a custom event on the dataLayer, however this data is accessible from the automated internal events, once you’ve configured your variables within GTM.
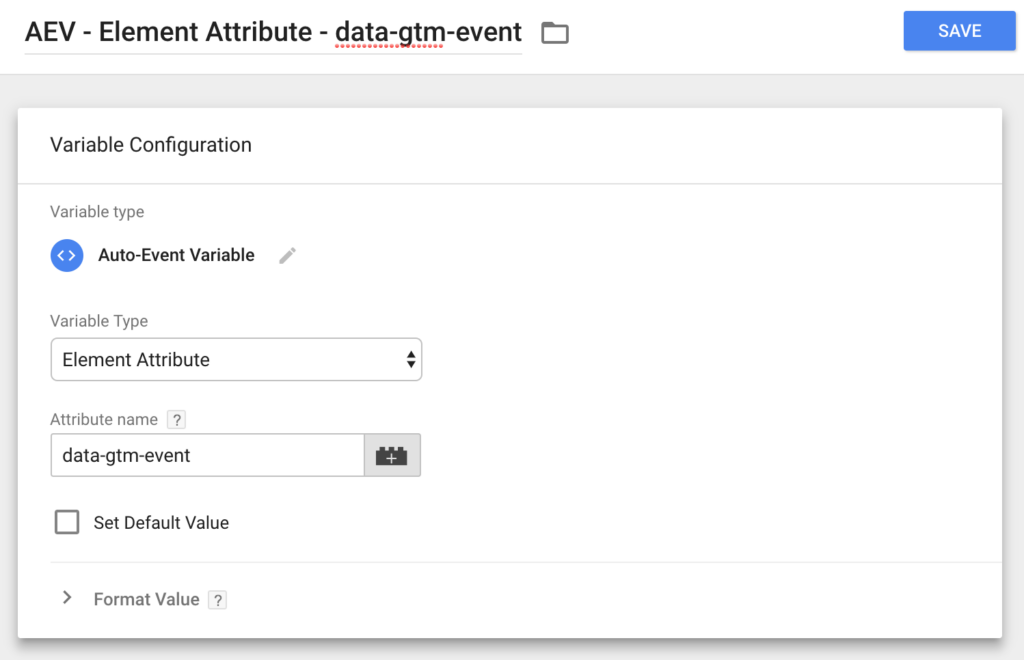
First create a variable for your new attribute, as this data will be extracted within an auto-event, you will need to select “Auto-Event Variable” as the variable type.
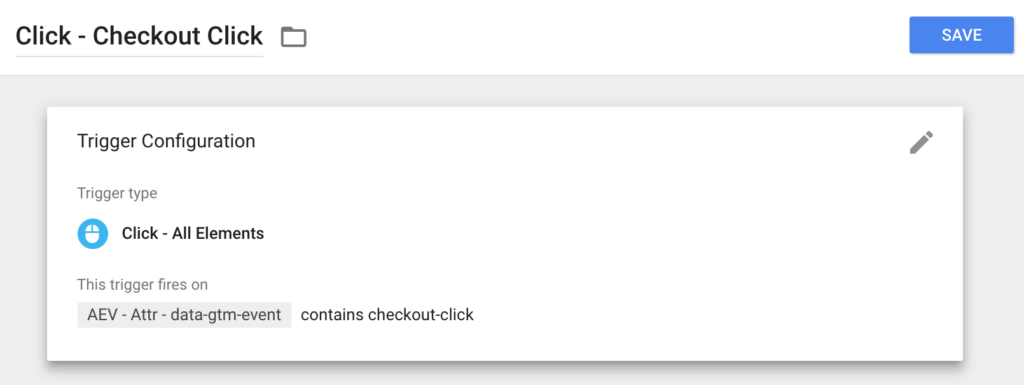
Next, create a new auto-event trigger depending on your attribute placement (i.e. you want a linkClick if this attribute has been added to a link) and use the variable you created in the last step as a requirement for the tag firing logic.
In our current example, this would look like this:
And that’s it, you’ve got a consistent approach to deploying custom events that can be used alongside auto-events to limit your reliance on attributes that are likely to change (such as the text, class, URL etc).
Top Tip: This approach is really handy for linkClick events, avoiding the need to manage the page change with the dataLayer approach. With meta-data within data-gtm-* tags you can enrich your events with additional data/legibility.
3. Using documented and consistent website IDs/Class names
This is our least favoured approach, more of a last resort, but an option. This approach is basically identical to the second option discussed above (except you can use Click Class Names and Click ID built-in variables instead of the custom variable discussed above).
If you have a close relationship with your developers and they are totally onboard with Analytics tracking and the impact changes to the website might have then this option can work and sometimes platform restrictions get in the way of the other options anyway and you’re forced to!
This approach is very similar to the data attribute – so why bother with data attributes? The big difference is that a data attribute will be expected to need to be consistent, whereas other attributes don’t have that same expectation (hey, someone in marketing wanted that button pink, not blue!).
We see this approach all too frequently with legacy accounts we pick up and more often than not, something has broken over time. This is the easy approach, it means you don’t have to (necessarily) collaborate with your developers – but if you don’t, don’t expect them to know that that class was being used for your tracking!
Ok, but when should I use Auto-Events?
The following examples, in our experience, are good uses of auto-event triggers and we’d recommend using them for similar, generic, tracking requirements or when combined with data-* attributes:
- Tracking of external link clicks to third party websites
- Social media link clicks
- Email click tracking
- Video interactions
- Page scroll depth tracking
- Sub-domain clicks
- File Download Clicks
- Internal link clicks
You can listen to the full, inspiring conversation with Deema Tamimi on the FINITE Podcast.


